

How to Make Biochar for Soil: A Permanent Upgrade for Your Farm
Burning crop waste releases its carbon into the air. Turning it into biochar locks that carbon into your soil instead — building fertility that can last for centuries, not seasons.
Quick answer
Biochar turns crop waste you'd otherwise burn or throw away into a soil amendment that can keep working for hundreds of years. The two things that make or break it are simple: use dry, seasoned material, and always charge it with compost, manure, urine or worm castings before it goes into your soil — never apply it raw. Start with a small cone pit, get the charging step right, and biochar becomes one of the few farm investments that keeps paying you back long after you've made it.
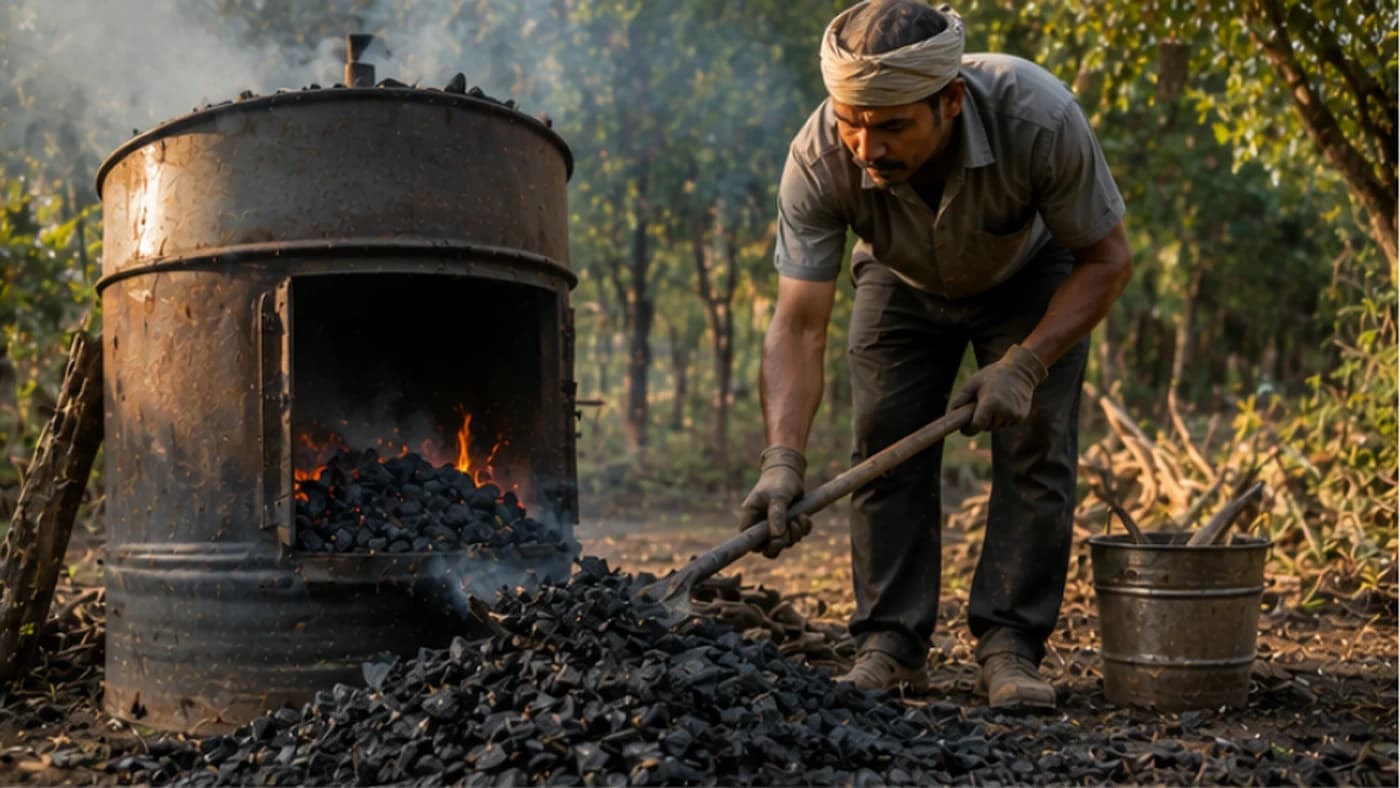
Every season, farmers burn or throw away enormous amounts of crop residue, stubble and prunings. That waste can instead become biochar — a stable, carbon-rich material that, once mixed into soil, keeps working for hundreds of years. It isn't a new invention: it's the same principle behind the famously fertile Terra Preta soils the Amazon's ancient farmers built over 2,500 years ago by mixing charred residue into their fields.
What biochar actually is
Biochar is a specialised form of charcoal made through pyrolysis — heating organic material (biomass) to high temperatures with little to no oxygen present. Unlike an open fire, which burns material down to white ash, pyrolysis preserves the physical structure of the wood or residue, leaving behind a porous, carbon-rich skeleton.
That structure is the whole point: every piece of biochar is riddled with millions of microscopic pores that give beneficial soil microbes somewhere to live and give nutrients somewhere to latch on. In effect, you're installing a permanent battery for water and minerals in your soil.
The three stages of pyrolysis
Heating wood without oxygen doesn't burn it in the usual sense — it decomposes it in three stages. First is drying, where the initial heat simply drives out remaining moisture (you'll see thick white steam). Next is pre-carbonisation, between roughly 200°C and 500°C, where unstable components like cellulose start breaking down and the wood's structure begins turning into a stable carbon lattice.
The final stage, carbonisation, happens between about 500°C and 800°C, where most volatile gases burn off and you're left with material that's 80–90% pure carbon. Go too hot for too long with oxygen present, though, and the carbon itself oxidises away into mineral ash — so the goal is always to stop the process right at peak carbonisation.
Simple ways to make biochar yourself
The cone pit (or Kon-Tiki) method is the simplest and oldest: dig an inverted cone-shaped pit, light a small fire at the bottom, and once it's burning steadily, keep adding thin layers of dry wood or crop residue on top. Each new layer smothers the one below and blocks oxygen from reaching it while heat from above continues to bake it. Keep layering until the pit is full, then quench everything immediately with water.
A drum retort is cleaner and more controlled: place your feedstock inside a sealed metal drum with a few small vent holes, then set that drum inside a larger outer fire. The outer fire bakes the material inside without burning it directly, and the gases released (syngas) vent out and often ignite themselves, helping fuel the process with almost no smoke.
A top-lit updraft (TLUD) kiln is a vertical pipe or barrel filled entirely with wood and lit from the top; as the fire burns downward it creates a moving heat front, while a secondary air supply burns off the gases released — a clean-burning option for smaller batches.
Why you must charge biochar before using it
The single biggest beginner mistake is putting raw, freshly made biochar straight into the soil. Fresh biochar behaves like a dry sponge — it will pull nitrogen and moisture out of the surrounding soil to fill its own pores, which can stunt your plants for a season. You must charge (or inoculate) it first, loading those pores with nutrients before it goes anywhere near your crop.
- Compost soaking: mix biochar into an active compost pile for 2–4 weeks so microbes and nutrients migrate into it.
- Urine charging: soak biochar in a barrel of diluted urine (human or animal) for about a week — a nitrogen-rich, traditional method still used by many growers.
- Compost tea drenching: soak in a concentrated compost tea for 24–48 hours if you're short on time.
- Worm-casting slurry: mix biochar with vermicompost and water into a thick slurry that fills the pores with a nutrient-dense mix.
What biochar does for your soil
Once biochar is in your soil, it doesn't break down like compost or manure — it stays and keeps working, often for centuries. In sandy soils that drain too fast, it acts like a reservoir, and in some trials biochar-amended soil held up to 12% more moisture than untreated plots.
Mycorrhizal fungi are especially drawn to biochar's structure, using it as a safe habitat, which supports the soil biology that resists pests and boosts yield. Biochar also carries a strong negative electrical charge (a high Cation Exchange Capacity) that grabs onto positive nutrient ions like potassium, calcium and magnesium, holding them in place instead of letting them wash away in heavy rain — and in heavy clay soils it helps break up compaction so air and roots can move deeper.
Mistakes that ruin a batch
- Using wet or green feedstock: produces thick, acrid smoke and very little usable char. Always use residue or wood that has dried for at least six months.
- Over-burning: if you don't quench or seal the kiln at the right moment, the carbon keeps burning down to white ash, which lacks biochar's structural benefits (though it's still a decent potassium source).
- Applying it raw: uncharged biochar temporarily locks up nitrogen in your soil — if leaves turn yellow after adding biochar, you likely skipped the charging step.
- Breathing the dust: dry biochar crumbles into fine dust that irritates the lungs. Wear a mask when crushing it, or keep it damp while handling.
When biochar isn't the right tool
In soil that's already highly fertile and rich in organic matter, biochar shows little immediate benefit — the biggest returns are in marginal soil that's too sandy, too acidic, or worn down by years of chemical use. Biochar is also generally alkaline, so heavy applications around acid-loving crops can push soil pH too high; always check your soil's pH before and after a large application.
It's a permanent amendment — once tilled in, it's not coming back out — so quality matters. Poorly made char produced at too low a temperature can retain toxic resins, so it's worth getting the process right rather than rushing it.
How much to use, and how
A good rule of thumb is to aim for biochar making up around 10% of soil volume in the top 15 cm of a bed — for a standard 1.2 x 2.4 m raised bed, that's roughly one large sack of charged char.
After quenching, crush the cooled char into pieces about the size of a pea to increase surface area and make mixing easier. If you don't want to dig up an entire plot, a simple trench about 15 cm deep along a planting row, filled with a couple of centimetres of charged biochar and covered back over, works well. One of the smartest tricks is to use raw biochar as bedding in a chicken coop or goat pen first — it absorbs odour and nitrogen from the manure, effectively pre-charging itself before the whole mix goes to the compost heap.
A real example: reviving a tired vegetable bed
Picture a roughly 9 sq. m vegetable patch with heavy clay soil that bakes hard in summer and where tomatoes are struggling. The grower produces raw biochar using a drum retort, crushes it, and soaks it in a 50/50 mix of compost and water (with some diluted urine added) for two weeks until fully charged.
Spread over the bed and worked into the top 10 cm, the clay noticeably softens within one season. By the following summer, the grower is watering roughly 30% less often, and the tomatoes stay healthier through peak heat — a benefit that, done right, will keep paying off on that same patch of ground for generations.
Terms explained in this guide
Frequently asked
What is biochar and how is it different from ordinary charcoal ash?+
Biochar is made by heating organic material with little to no oxygen (pyrolysis), which preserves a porous carbon structure. Ordinary ash comes from burning material fully in open air, which destroys that structure and leaves only minerals behind.
Why can't I add fresh biochar straight to my soil?+
Freshly made biochar acts like a dry sponge that pulls nitrogen and moisture out of the surrounding soil to fill its own pores, which can stunt plant growth. It needs to be charged first — soaked in compost, manure tea, diluted urine, or a worm-casting slurry for one to four weeks.
How much biochar should I add to my soil?+
A commonly used guideline is around 10% of soil volume in the top 15 cm of the bed. More isn't automatically better, especially in soils that are already fertile.
Can biochar be made without special equipment?+
Yes — a simple cone-shaped pit dug in the ground, quenched with water at the end, is the oldest and simplest method. A sealed metal drum inside a larger fire (a retort) produces cleaner, higher-quality char if you want to scale up.
Is biochar suitable for every kind of soil?+
It gives the biggest benefit in poor, sandy, or degraded soil. It's generally alkaline, so use it cautiously around acid-loving crops, and it's a permanent addition — once mixed in, it isn't easily removed — so it's worth making sure your batch is properly charred and charged first.
Where to go next
Want this as daily tasks for your farm?
Khetiyaar turns guides like this into a day-by-day plan — in your language, free to start.

Related guides
How to Build a Garden Worm Tower for Free, In-Bed Composting
Stop hauling kitchen scraps to a distant bin and hauling compost back months later. A buried worm tower lets worms process waste right where your plants are growing.
Composting at Home: Turn Waste Into Gold for Your Farm
The best fertiliser is often free, made from waste you already have. Layer browns and greens, keep the pile moist, and in months you have rich compost.
Terra Preta: The 2,000-Year-Old Soil That Gets More Fertile With Age
Ancient Amazonian farmers built soil that is still 10x more fertile than the surrounding land 2,000 years later — using biochar, organic waste and minerals. Here's how to build a modern version in your own field.