

How to Grow Oyster Mushrooms on Straw at Home
A single bundle of wheat or paddy straw can turn into 10-25 kg of fresh oyster mushrooms across a few harvests — using a bucket, a bag of spawn, and space no bigger than a porch corner.
Quick answer
Growing oyster mushrooms on straw turns an agricultural by-product most farms already produce into a fast, high-value protein crop — needing no land beyond a shaded corner, a bucket, and consistent attention to moisture and cleanliness. Get the pasteurisation and moisture level right, and a single bundle of straw can feed a family or supplement income for weeks.
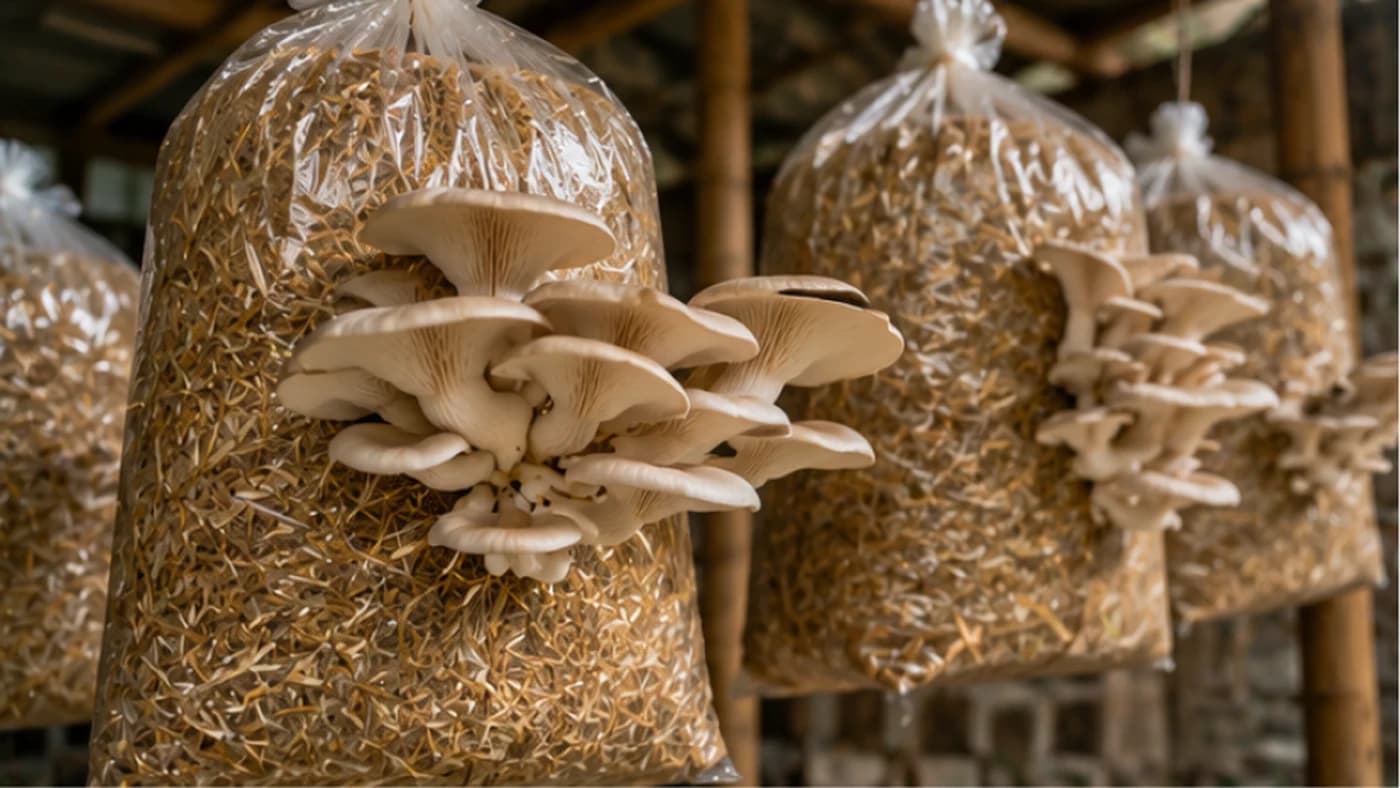
Oyster mushrooms are one of the easiest crops to grow at home, and the substrate is something most Indian households or farms already have easy access to: wheat or paddy straw, a by-product that would otherwise be burned or left to rot in the field. With a bucket, a bag of mushroom spawn, and a shaded corner, you can go from straw to a fresh harvest in as little as three weeks — at a fraction of the price of market mushrooms, using almost no space.
Why straw, and which mushroom to grow
Straw is a high-cellulose material that oyster mushroom mycelium tears through fast, moving from inoculation to fruiting in as little as three weeks, compared to a year or more for log-grown mushrooms. It's also cheap, widely available from any grain mill or feed store, and works in hanging bags, drilled buckets, crates or laundry baskets — so it scales from a single porch bucket to a full backyard operation.
The Oyster mushroom (Pleurotus ostreatus and related species) is the most forgiving and productive choice for beginners — fast-growing and resistant to minor mistakes. Grey/blue oyster strains prefer cooler weather (good for winter and hill-region growing), while pink and golden oyster strains tolerate summer heat better, so choose the strain that matches your season and region.
Preparing the straw
Chop straw down from its usual 25–30 cm length into 3–8 cm pieces — this packs more tightly, removes air pockets, and gives the mycelium a better structure to colonise. A basic sickle-cutter, chaff cutter, or even scissors for a small batch will do the job.
You must then treat the straw to knock back competing mould and bacteria before adding your mushroom spawn — this is pasteurisation, not full sterilisation, and it's the single step that decides success or failure.
Two ways to pasteurise straw
Hot water method: submerge the chopped straw in water heated to 65–75°C for 60–90 minutes. This kills most harmful mould and bacteria while leaving some beneficial organisms behind. Drain thoroughly until the straw reaches 'field capacity' — squeeze a handful and only a drop or two of water should come out; too wet invites rot, too dry stalls the mycelium.
Cold lime-soak method: soak the straw in water treated with hydrated lime (calcium hydroxide) at roughly 1 gram per litre, raising the pH to around 12, which suppresses competing organisms chemically rather than with heat. Soak for 12–24 hours, then drain well. This method needs no fuel or heating and suits larger batches or hot climates where boiling large volumes of water is impractical.
Building your grow setup
Take a bucket (or a plastic bag) and drill or punch holes roughly 1–1.5 cm wide, spaced about 15 cm apart all around the sides — these are where the mushrooms will emerge. Layer pasteurised straw and crumbled grain spawn alternately, packing each layer down firmly: use a spawn rate of about 10% by weight — for every 10 kg of wet straw, use roughly 1 kg of grain spawn — for the fastest, most even colonisation.
Place the filled container in a shaded, still spot (behind a shed, under a staircase, or in an unused room) where the temperature stays in a moderate range for your chosen strain. Leave it undisturbed for roughly two weeks while the mycelium turns the straw into a solid white block; then small mushroom 'pins' will emerge from the holes.
From pins to harvest
Once pins appear, mist the bags or buckets lightly with clean water twice a day — mushrooms need humidity but also fresh air, since a stagnant, high-CO2 environment causes long, thin stems and tiny caps instead of healthy, broad-capped mushrooms. If you see that spindly growth, it's a sign to increase airflow around the grow area.
Within about five days of the first pins appearing, they grow into full clusters ready to twist off by hand. A single setup typically gives two to three good flushes (harvests) over four to six weeks before the straw's nutrients are used up.
Yields and realistic costs
A single bundle of straw, once fully processed, can produce roughly 20-25% of its dry weight in fresh mushrooms across all its flushes — so a bundle that costs very little in most rural areas can realistically yield several kilograms of fresh oyster mushrooms, worth far more at local market rates than the straw, spawn and labour combined. This makes it one of the best-return small enterprises for a farm household, a self-help group, or a backyard grower.
Common mistakes and how to avoid them
Moisture control is the single biggest factor: too wet and the straw goes anaerobic, causing 'sour rot' (a bacterial infection with a foul, garbage-like smell that kills the culture); too dry and the mycelium simply stalls. Always check with the field-capacity squeeze test. Using hay instead of straw is another common error — hay carries seed heads and more nitrogen, which attracts green mould (Trichoderma); always use clean, seed-free straw. Keep your hands, tools, and grow area as clean as possible during inoculation, since green, black or orange patches on the straw signal contamination from poor pasteurisation or dirty handling — discard any contaminated bag well away from your other setups and try again.
Limitations to know
Straw doesn't suit every mushroom — species like shiitake need the denser lignin found in hardwood logs and won't thrive long-term on straw alone. Straw-grown setups also have a shorter productive life than logs: two to three flushes over about six weeks, versus logs that can fruit for several years. In very dry climates, keeping a straw setup adequately moist can take daily attention; in very humid, still air, mould pressure rises, so make sure your grow spot has some air movement.
Tips for better yields
Supplementing the straw with 5–10% wheat bran or rice bran by weight can meaningfully boost yields, though it also raises contamination risk, so your pasteurisation must be thorough when supplementing. Use clean, non-chlorinated water for misting where possible. Label each batch with the date and strain, since timing and record-keeping quickly tell you what's working in your specific space and season.
Frequently asked
How long does it take from straw to harvest?+
Roughly three weeks from inoculation to the first harvest, with two to three flushes total over four to six weeks from one batch of straw.
Do I need special equipment to pasteurise straw?+
No — a large pot or drum of hot water works for the hot-water method, or a container with hydrated lime and water for the cold lime-soak method, which needs no heating at all.
Why is my straw rotting instead of growing mushroom mycelium?+
It's almost always too much moisture (anaerobic 'sour rot') or contamination from unclean handling or incomplete pasteurisation. Check the field-capacity squeeze test and clean your tools and hands before inoculating.
Can I grow mushrooms year-round in India?+
Match the strain to your season and region — grey/blue oyster strains do better in cool weather or hill regions, while pink and golden oysters tolerate summer heat better.
How much can I earn from a small mushroom setup?+
A single processed bundle of straw can yield several kilograms of fresh mushrooms across its flushes, often worth several times the combined cost of straw, spawn and labour at local market rates.
Where to go next
Want this as daily tasks for your farm?
Khetiyaar turns guides like this into a day-by-day plan — in your language, free to start.

Related guides
Heating a Greenhouse With Mud and Straw: The Free Thermal Mass Bench
No electricity, no diesel heater, no gas cylinder — just clay, sand, straw and the sun. A thermal mass bench keeps a polyhouse or low tunnel warm through winter nights for free.
Trench Composting for Beginners: Bury Your Kitchen Waste Straight Into the Bed
Skip the compost pile and the turning altogether. Bury your kitchen scraps directly where your next crop will grow, and let the soil itself do the composting — no smell, no pests, no extra corner of the yard needed.
Winter Sowing vs Grow Lights: The Free Way to Raise Hardier Seedlings
Indoor grow lights run for 14-16 hours a day and add up on the electricity bill — and the seedlings they raise are often leggy and need careful hardening-off. Winter sowing in recycled containers outdoors costs almost nothing and produces tougher plants.